


Ford Focus WRC '02
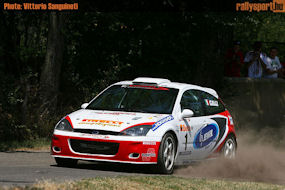
Ford Focus WRC 02, Rally Oltrepò Pavese 2007
Go to latest entry (december 5, 2010)2009, August 23
After successfully finishing (finally...) the build of the Peugeot 307 WRC, driven by Gigi Galli in the Rally of Corsica in 2006, it was time to start another build in my Gigi Galli collection.This time I decided to up the game a bit for me as a builder. Let's hope it all works out how I'd like it to...
The car I decided to model is the Ford Focus WRC 02 which Gigi Galli drove in the Italian Rally Oltrepò Pavese in 2007.
The rally was a rally from the Italian championship and not a World Rally event. Below is a picture of the car I'm going to model.
After the shock withdrawal of Mitsubishi from the World Rally Championship at the start of 2006, Gigi took part in the first 2 WRC rallies with the help of Ralliart Italia. After that, Gigi competed several rallies in the Peugeot 307 WRC with the aid of Pirelli.
But he didn't have enough funds to carry on in the WRC in 2006. For 2007, Gigi had found several sponsors, and planned to take part in most of the WRC rallies in 2007 with a PH Sport prepared Citroen Xsara.
But sadly, one of the sponsors couldn't fullfill it's commitment, and Gigi had to abandon his 2007 WRC season after the Rally of Portugal.
In preparing for the 2008 season he took part in the Beta Rally Oltrepò Pavese (2007).
I specifically chose this car to model because I wanted to model a subject that hasn't been done before. At least the livery, because the Ford Focus is quite a common rally model, so nothing special about that.
Problem with this livery is that there is no aftermarket manufacturer that makes decals for this car, so I'll have to make them myself.
The kit
For this build I needed an 02 version of the Ford Focus WRC in tarmac trim.Tamiya would appear to have one in it's catalog, but in reality that's just an 01 version with an 02 livery.
As the Tamiya "02" version had the wrong wheels, I decided to buy the 01 version of this kit and to transform it into an 02 version I purchased the appropriate transkit from Renaissance.
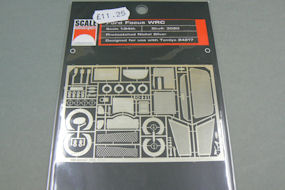
I also bought a set of PE parts from Scale Motorsport to enhance this build and a set of Xenon lights from Renaissance.
Below are several pictures of the parts I'm going to use in this build.


Let's get started
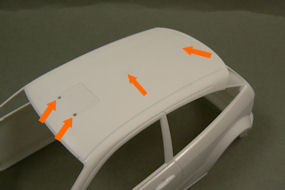
After showing the kit and parts I'm going to use in this build, it's time to get this build underway.First part I took to was the body of this kit. There were several prominent mold lines which had to be taken care of (as can be seen in the following pictures).
Apart from that, the car Gigi Galli drove didn't feature any antenna's. So the molded in antenna bases had to be removed. I carefully sliced them off with a sharp knife and sanded the area smooth with sanding sticks.
Because the original airscoop for the roof will not be used, the holes in the roof need to be filled too. Which hasn't been done yet, as can be seen below.
As I have to fill several sink marks, especially in the rear spoiler, I decided to wait till I have cleaned up all other parts too, so I can fill/repair them all at once.
Nose job
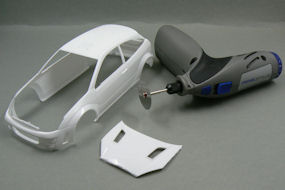
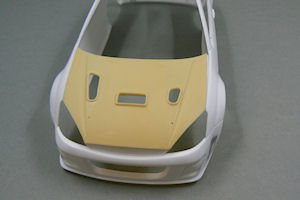
The next step was a bigger operation. I had to remove the original hood, to fit in the Focus WRC 02 hood from the Renaissance transkit.As if I needed a reason to put one of those great saw-blades on my Dremel...
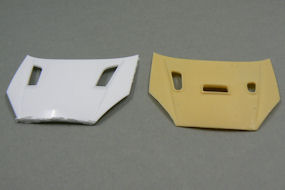
I used the Dremel to roughly cut loose the original hood. After I had done that, I used knifes and sanding sticks to remove the last small bits of the original hood and to clean the cuts.
Second picture below shows the old and new hoods together.
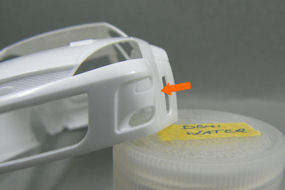
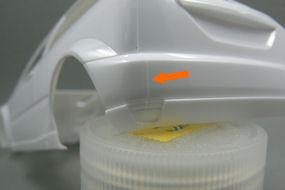
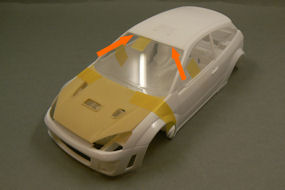
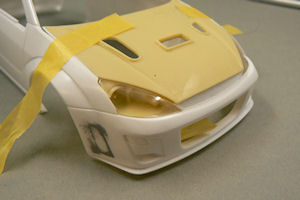
Next step was to see how and if the new hood would fit. To verify the fitment of the hood, I first taped the windows to the car. The reason for that will be explained.
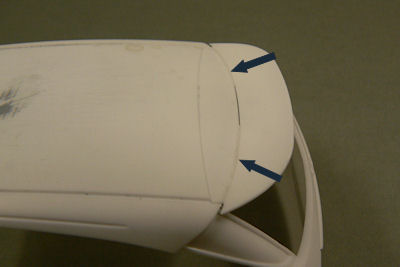
After that I taped the new hood to the car. And look, there's a slight gap to either side of the hood, especially near the windscreen.
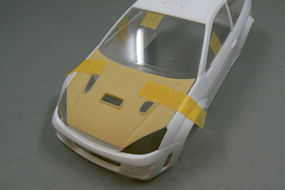
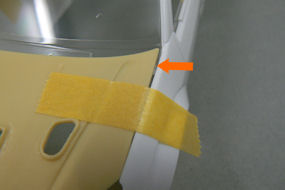
I tried to close the gap by putting some more pressure on the sides of the car. And it does indeed close the gap with the new hood, but also pushes down the windows, because there is not enough room for them anymore.

I'm still considering how I'm going to solve this. Fill the gaps is one option. The other option is cutting up the windows and see if I can get them to fit properly in several pieces.
Problem with this last option is that the A-style of this car is very thin, so there's no room to hide any errors in the windows. But it shouldn't be impossible.
So far so good
In the meantime I have cleaned up all the parts in this kit. Next step will be filling the sink marks en spots I've come across (not too many, this is a Tamiya kit remember), wash the parts in warm soapy water and start painting.Before I start painting the body, I will have to figure out where all the sponsors go, how big the decals should be, etc. So there's still a lot of work to do, before I can start painting the body.
I've tracked down all the sponsors on the internet, for better versions of their logo's.
So the next step will be to determine the correct position and size of the decals, design a decal sheet with all the decals and print it (or let it print).
I hope to show you some of the progress on the decals in the next update (whenever that will be).
This is it for now, see you next time.
2010, December 5 - Finally, more progress
As I already mentioned on the what's new page, becoming a father has disrupted my modelling activities somewhat. But nevertheless, progress has been made.First thing I did, when I had cleaned the body, was fill the vents in front of the front wheels and blend them in with the body by using some standard Tamiya putty.
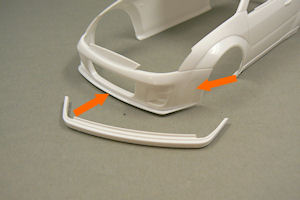
I also made a new front lip, because the original kit one wasn't correct for the car Gigi drove in this particular rally.
I made the new lip (using the body as a template) out of a .5 mm Evergreen styrene sheet. It has to be said that the lip in the picture below is still a bit large. I sanded it down in the meantime to better match the original. Also shown in the picture is the original lip from the kit.

To bridge the gap between the new hood and the body I've decided to glue tiny strips of styrene to the sides of the hood and sand these to size, filling the gap.
In the dry-fit with the xenon light pods and the glasses can be seen (the second set of images below) that there is still some work to do. But I'm content with the result so far.
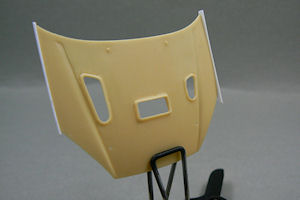
Next part I've worked on was the roof scoop. The Focus '02 model has a larger roof scoop that the kit supplied Focus '01 version.
I closed the holes for the original roof scoop with some putty and als smoothed out the roof of the car, so the new roof scoop can be mounted flush to the roof.

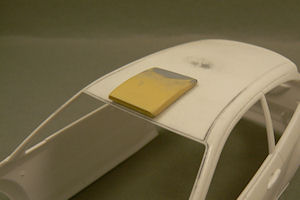
To add a little more depth to the roof scoop I dremelled (is that a word?) out the intake and outlet openings with a small burr.
As can be seen above, not all went well and a bit of repairing was required with some Tamiya standard putty (which worked perfectly).
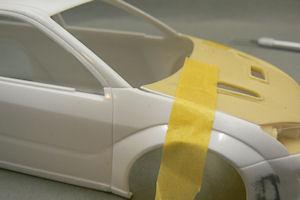
The rear wing of the car is a separate part in the kit, but if left unattended, it will create an additional panelline which wasn't present on the real car (see first picture below).
Since taking this picture I have used putty to hide this wrong panelline.
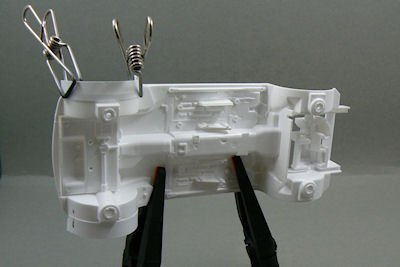
Another thing that bugged me was the fact that you could look through the car (from above) because of the open wheel arches. So I decided to close them.
First I glued a piece of styrene onto the existing wheel wells on the chassis. Next step will be to use some Milliput to finish the wheel arches.
More on this will be in the next update.