


Ferrari F430
Ferrari F430
Go to latest entry (december 5, 2010)2007, April 1
This will be my Build Report for a Ferrari F430.The kit I am going to build is the one manufactured by Fujimi, in scale 1/24.
I'm not really a fan of Ferrari's in general, but I thought that this car had a nice flowing body-shape, without looking over the top like the Ferrari F40, F50 or Enzo. And also the price was nice, so that made the decision to purchase this kit also a bit easier.
Once the kit was purchased I also bought the Crazy Modeler photo-etch detail set (original release) for this kit.
Apart from this detailset I am not going to do much extra detailing. This will be my second car since a 15 year break from the hobby, so I thought taking it a bit easy would be a good start.
I started the model bij removing several of the moulded grilles, because I had etched versions in the CM PE set.
I used a pin vise with several different drills to open the grilles roughly. After that I continued with a hobby-knife to further open up the areas. And last step was smoothing the edges with sand-paper, before glueing in the PE parts.
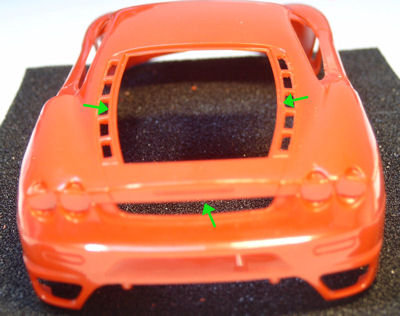
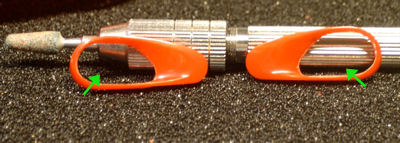
For the final detailing of the front air intakes I used a grinding tool from my Dremel in the pin vise. Worked great and I had full control, which cannot be said when your having a 10.000 rpm Dremel in your hands...
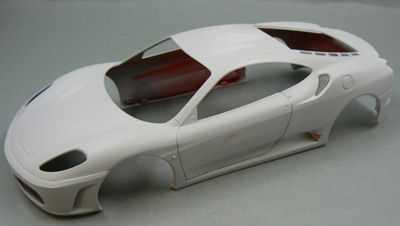
After the parts were cleaned and the mold lines were removed from the body, I glued in the PE parts with CA glue.
After the glue had cured, I sprayed the body with Tamiya Grey Primer. I used my airbrush for this job because I feel that I cannot control the priming enough by using the original spray-can.
Therefore I decanted some of the primer in a jar and after thinning it a bit with Tamiya's Lacquer Thinner I airbrushed the primer onto the body in several thin layers.
I sanded the primer after each layer to remove the inevitable dust-particles and to remove the mould-lines I forgot before.
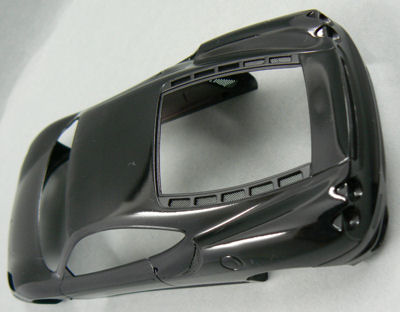
The following pictures where taken after I (lightly) sanded the first coat of primer.
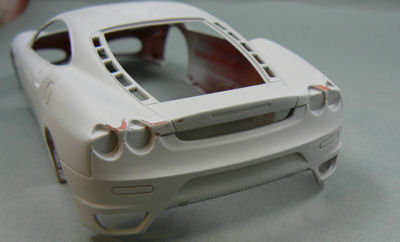
In the meantime I had also started work on the engine bay. Or at least, what has to look like the engine bay. I don't really have much complaints about this kit. This is actually my first Fujimi kit and I'm very satisfied with the fitment of parts. But, the engine bay is very much simplified, which is a bit of a shame. Because of the large window on top of the engine bay, the engine is very visible.
Revell, which has also a Ferrari F430 kit for sale, has done better in that regard. But, as I said, it's only a minor "problem".
I'll just have to try and detail as much as possible in the engine bay, to make it look a bit better.
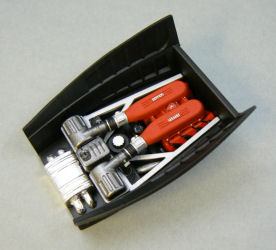
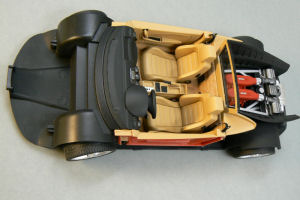
The following picture shows the current state of the engine compartment:
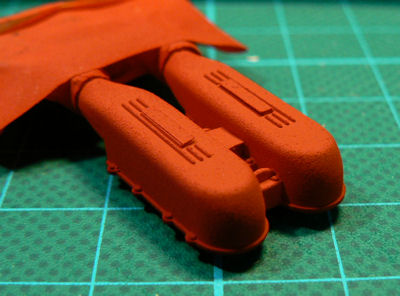
When I looked at my reference pictures I noticed that the intake plenum on top of the engine had some sort of casting structure.
A structure which wasn't visible in the kit part so I decided to try to create this structure myself.
At first I thought I would use some stuff that is called "Cast-a-coat". It consists of two parts; glue and powder.
At first you brush the glue onto the parts you want to have a casting texture. After that you gently pour the powder over the wet glue. The powder sticks to the glue and after the glue has dried you have a nice casting texture.
At least, that's what it says in the manual. However, I noticed that the glue is quite thin and so it was very difficult to keep the glue from going where I didn't want it.
So after this first, botched, attempt, I put the intake plenum into some brake-fluid to strip it of it's coat.
After some searching on Automotive Forums I found another technique to create casting texture. And this one worked.
The user on Automotive Forums wrote that he sprayed the paint with high(er) pressure from a greater distance so that the paint is already partially dried before it hits the part and thus creates a rough texture.
Something which normally happens when you don't need it, in my experience.
Suffice to say, I couldn't get it to work. Maybe I thinned the paint too much, I don't know. What did work for me though was to use very low pressure (0.6-0.7 bar) and to spray only a very small amount of paint.
And the result was this (which I'm very happy with, by the way):
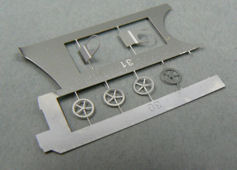
After I finished the engine bay (well, apart from the detailing that is), I turned my attention to the brakes.
I was going to use the brakes from the PE-set. This was going to be a first for me, as I have never used PE parts before.
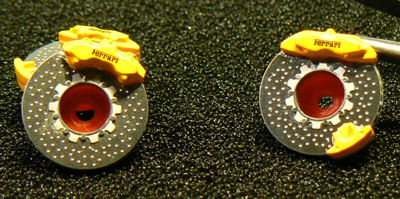
The brakes consist out of 6 etched pieces which must be glued together to create the brake-disks. The brake calipers had to be removed from the original brake disks that were in the kit.
I must say the the original brake disks were already very nice. But I figured, now that I have this PE-set, I sure am going to use it.
It took some time for me to get al the 6 brake pieces correctly aligned. As a matter of fact, my first attempt ended up inside a jar with acetone, to dissolve the CA glue. Let's just say, my first attempt was just that. An attempt.
By the second time I had figured out a way to get the pieces aligned, and keep them aligned, until the glue had cured enough.
And after I mated the brake disks with the original calipers, it looked like this:
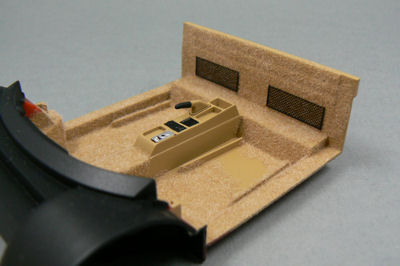
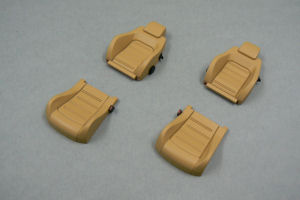
In the meantime I had also started on the interior of the car.
I was planning to give the interior a kind of 'leather-look' tan colour. And to top it all off I bought some Soft-Flock fibers from Donjer to give the interior a bit of an extra dimension.
I had never used flocking before, so this was going to be a first for me too. But in the end it was a breeze to apply the flocking. Using the glue from Donjer, I brushed the glue (which dries transparent, luckily) onto the parts I wanted to 'flock'. And after that I 'poofed' the flocking material onto the glue with a squeezing bottle.
At first I thought "what the flock" (ha-ha-ha), but after I removed the excess fibers it looked absolutely perfect.
Take a look for yourself:
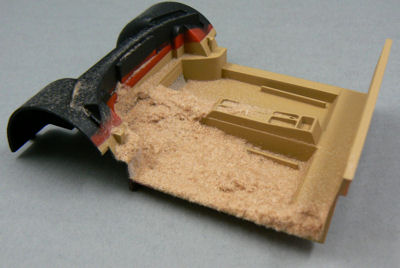
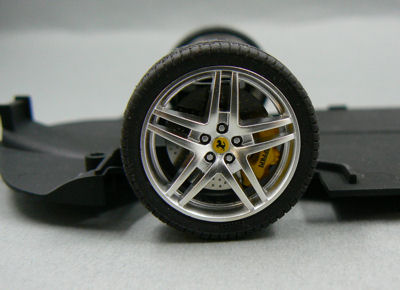
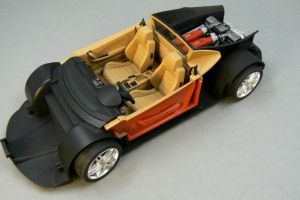
The floorplate of the car had already been finished by me. I had painted it with Tamiya X-18 semigloss black. And after the paint had cured I airbrushed some satin clear over the floorplate, to give it a bit of a nice even finish.
During the paintprocess of the floorplate I had also painted the suspension (or what has to look like a suspension, because it has been very much simplified). And now it was time to mount the finished suspension components, the brakes and the wheels to the floorplate.
Looks great (at least, that's my opinion):
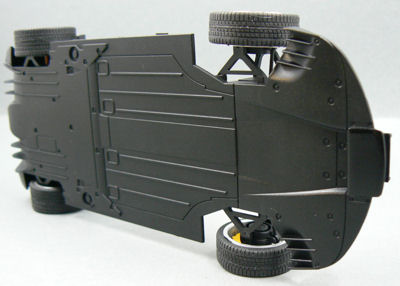
In hindsight, I should have given the brake-discs a wash, to better display the drilled (actually etched) holes in the brake-discs.
Something I have to remember for my next build.
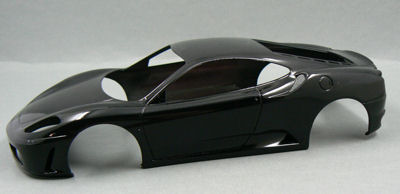
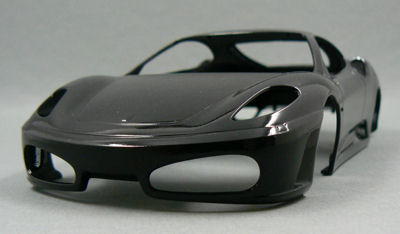
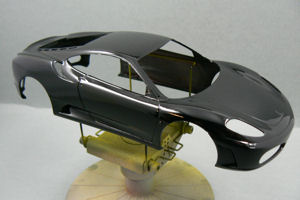
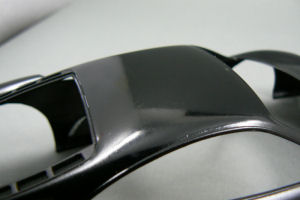
April 24, 2007 - Painting the body
And what a body it is.After glueing the PE parts to the body, I coated the model in a few thin layers of primer to create an even underground for the paint to adhere to. The primed body can be seen on the first page.
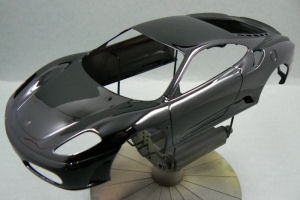
I decided to give this Ferrari F430 a black color. Red Ferrari's can be found all over the internet and forums. I just wanted something a little bit different and I also think that black is a very cool colour for this car. Gives it a bit of a menacing appearance.
After spraying a few light coats, I then proceeded with adding 3 wet coats to build up a nice layer of paint.
Which will probably be necessary as I'm going to use polishing compound and wax on this model. And as it is the first time that I'll be using those materials, I suspect that a sturdy layer of paint might come in very handy.
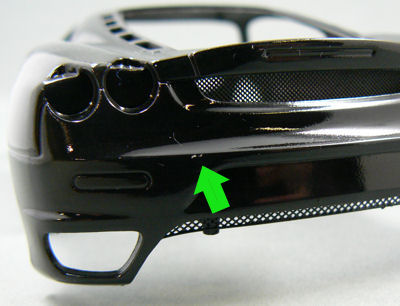
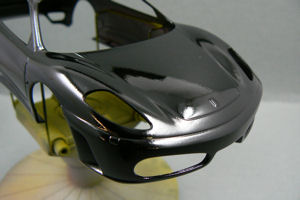
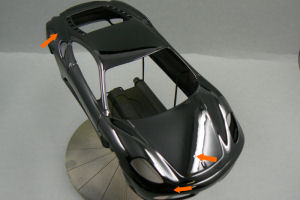
Below are several pictures of the current state of affairs.
When you look closely at the pictures, you can see that there is some overspray (very lightly) on the roof of the car.
When I painted the areas around the engine room vents, I thought that I had sufficiently masked the car. But apparently I didn't. But I'm guessing that I'll get this overspray removed with the polishing compound I'm intending to use.
A bigger problem I have is the fact that, on the back of the car, a spot of paint got chipped. For some reason I felt like dropping my tweezers next to the car. So what's the problem ? I just said that it fell next to the car...
Sadly, my cutting mat felt quite elastic that day and the tweezers bounced right onto the back of the car (with the sharp point of course). But as it is only a really small spot, I'll try to mask it with a bit of paint and hope that after polishing and waxing, the damage can't be seen anymore.
Details, details
The final picture I'm going to show in this update is of several PE parts that I still have to paint and put onto the car.I've already primed the parts, as can be seen in the picture.

Apart from adding the PE parts, I'm also intending to do some extra detailing in the engine bay. Not too much, but just a few things to liven it up a bit.
Until next time !
August 26, 2007
It's been a while since my the last update. I've been working on this model for quite some time now and it's now nearing completion.I only spend about 3-4 hours per week on modelling so progress is quite slow. But there is progress. And in this update I'll show you how far I've gotten with this model.
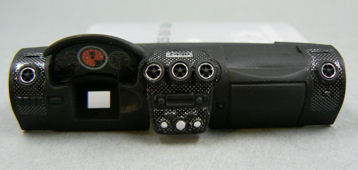
The first part I want to show you is the dashboard of this car. Most of the interior had been finished already, but the dashboard and steering wheel were still some way from completion.
The dashboard and steering wheel were first painted black (semi gloss) with Tamiya X18.
After that I sprayed several fine coats of satin clear (a mix of Tamiya X22 clear and X21 flat base) on the dashboard and steering wheel to give it a kind of leathery look.
I wanted to model the dashboard according to this example:

As can be seen on the image above, there are several sections of carbon fiber on the dashboard.
I intended to simulate the pattern with composite fiber decals from Scale Motorsport. The pattern I used was 'plain weave pewter'.
I made templates of the parts I wanted to cover with Tamiya masking tape. And with these templates I cut out the required pieces from the Scale Motorsports decal sheet, and glued them on the dashboard using MicroScale decal Sol and Set.
Great stuff for getting the decals to conform to the curved shapes of the dashboard.
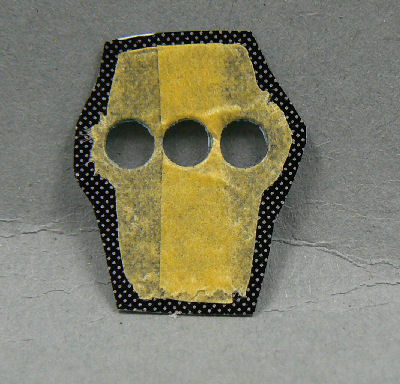
As can be seen in the last image, the application of the decals went not without some problems.
I had cut the decals slightly oversized, so I could trim the excess after application and thus guarantee that the decals would cover the intended parts completely. If you cut it exactly to size, I've noticed that for some reason the decals often don't fit perfectly. It's like they shrink slightly during application.
But in this case I let the decals dry slightly too long before cutting them to size. So I damaged the paint on the dashboard on several spots. The protective layer of clear didn't help much I'm afraid.
But luckily, the damaged spots could easily be repaired. After the decals had cured for several days, I brushpainted some MicroScale gloss clear on the carbon fiber decals to give it some shine.
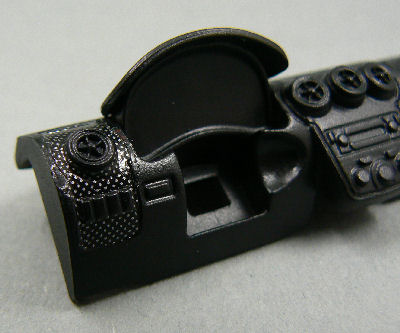
Below is a picture of the, almost finished, dashboard. I only have to add some etched parts to the 5 ventilation ducts on the dashboard.
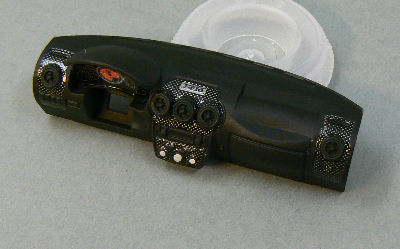
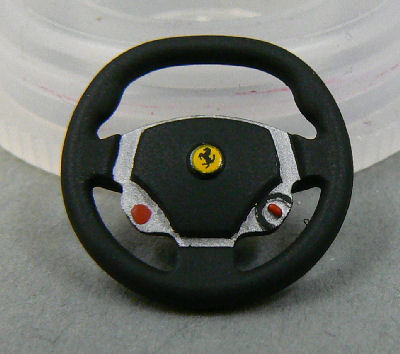
After I finished the dashboard I turned my attention to the steering wheel. The steering wheel has been nicely detailed by Fujimi. But it could have been better. For instance, the starter button was missing from the steering wheel. So I had to simulate the button with some red painted.
I used unthinned red paint from the Revell aquacolor range. As the paint is quite thick unthinned, it was the perfect solution for this smalle omission from Fujimi.
I tried to model the steering wheel according to the following example:
Note: Second picture is the steering wheel from the model...

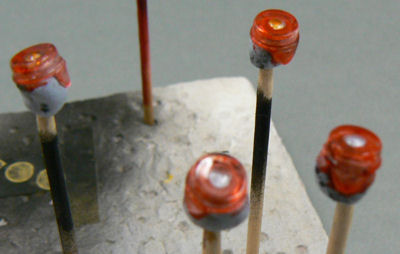
Lights
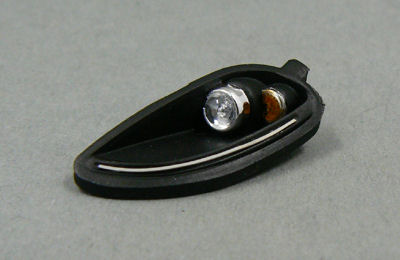
With work on the interior almost finished I turned my attention next to the lights of the car.This is how the front lights look on the real car:

I had already painted the lightpods for the front semi gloss black and put a few layers of satin clear on them.
Next I painted the indicatorlights orange with clear orange from Tamiya (X26) and painted the rim of the indicator lights chrome, using Alclad II chrome.
Final step was glueing all the parts together. For this I used MicroScale Kristal Klear, a glue that dries clear. Very convenient because some parts of the lightpods are made of clear plastic and if I had used regular modelling glue the parts would have become fogged.
Next in line were the rear lights. Pretty straightforward, they had to be painted with clear red and clear orange. In this case I again used clear paints from Tamiya (X26 and X27).
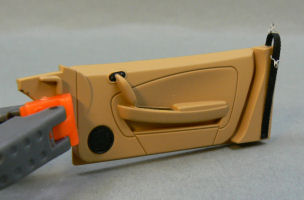
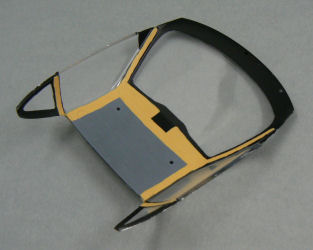
Windows
The most recent parts I've worked on were the windows of the car.The outer rims of the windows should be painted (semi gloss) black. The windows themselves have some thin lines molded into them, denoting the boundaries for the black areas.
Normally that would have been sufficient for masking of the windows for airbrushing the black on.
But in this case I created the masks (from Tamiya masking tape) with the templates that were provided in the Crazy Modeler detail set I've been using in this build.
With these templates I created the masks, stuck them to the windows, masked of the rest of the windows and painted the required areas semi gloss black using Revell aquacolor.
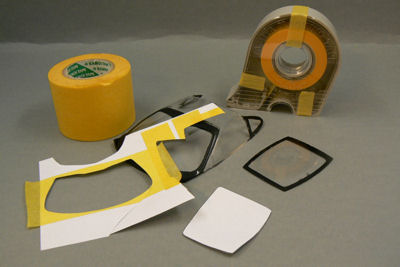
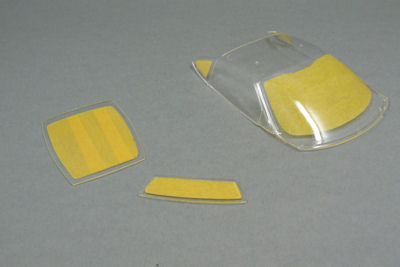
And the final result was very pleasing:
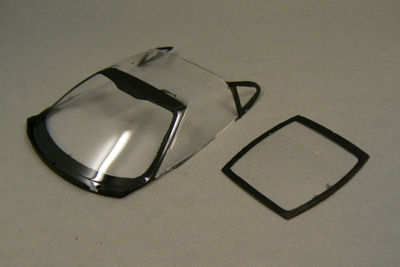
I still have to remove some tape residue from the windows here and there and touch up a few spots, but otherwise the windows are finished.
Next taks to tackle will be the final preparation of the car body. After that, I'll paint the window seals, glue the windows to the body and wax the body to give it a nice shine.
Pictures of this step will be shown in the next update.
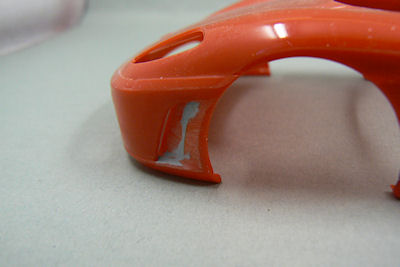
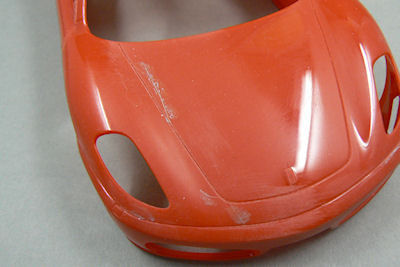
2007, October 16 - A minor mishap
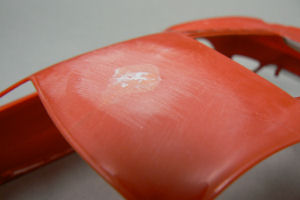
This build was quietly moving towards completion. Which was nice, because I want to take this car to the ESM contest at the end of November.But when I took the bodyshell out to commence the polishing and waxing of the body, I noticed a small white spot on the front of the hood of the car.
Hmm, nothing serious I thought and tried to remove the offending spot swiftly, but carefully.
Yes, I got it removed. Oh no, the underlying paint too !!! Very nice.

Out came the sanding paper and micromesh clothes. I gave the car a good sanding, masked the vents of the engine room and airbrushed the whole car again.
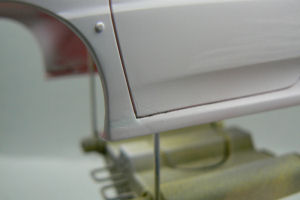
And it turned out quite fine. This action gave me also the opportunity to repair the minor damage on the rear bumper.
On the pictures below is the current state. As can be seen on the right picture, there's still some sanding to do. But in general the paint is looking very good and I'm confident that I'm going to get this car ready in time for the ESM event.
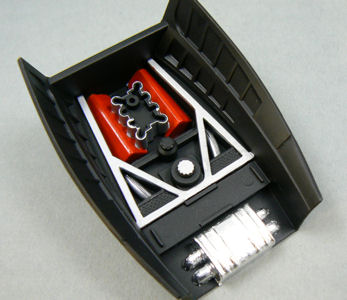
Engine compartment
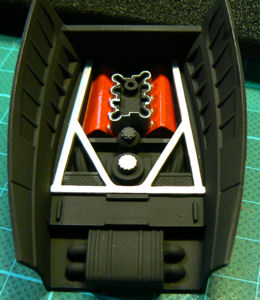
I've already started to make some additional parts for detailing the engine room. But before I start with that task, I had to do some painting first.I noticed that I'd forgotten to paint the exhausts, which are visible between the aluminum coloured triangles. As a colour I used chrome silver from the Revell Aquacolor range.
I'm still contemplating whether to paint a second layer, because the exhaust looks a bit dark now.
And I've also put some Bare Metal Foil onto the muffler (?). It's the first time that I used BMF. And I must admit that I'm not totally happy with how it looks. But as the part will be largely onscured when the car is put together, I won't do anything about it.
Looking back, it might have been better to paint that part. But as I said, it'll stay this way.
Other things
Apart from painting the body (again), I've also been doing some detail work on the dashboard.In the Crazy Modeler PE set there were some items included that should go onto the vents in the dashboard (third picture below). But to get them to fit correctly I had to sand some parts from the vents. As the dashboard was already completely painted, I decided to paint the borders of the vents.
And as it turned out, I think it looks just like the real thing. I don't think I could have achieved the same result with the PE parts.

End of this update.
2007, November 25 - a major mishap
To keep my updates in style, I decided to start this update also with a mishap. An unintentional one, but a mishap it was. A major mishap to be precise.Last update I mentioned that I wanted to take this car to the Euro Scale Modeling contest in Nieuwegein. But thanks to this major f*ck up, the car stays at home. Inside a nice comfy bath of brake fluid...
After I had sanded the very mild orange-peel out of the paint with MicroMesh sanding cloths, I took out the Tamiya Fine Compound (the one with the blue cap) to give the paint a nice finish.
And everything was going quite alright. I got a nice shine out of the paint and was quite satisfied with the finish. Only problem was that there were still minor swirl-marks visible because of the polishing process.
And for some reason I wasn't able to get rid of these marks.
In the meantime I had ordered some stuff from Hiroboy, amongst which was Finishing Compound from Tamiya. But as I wasn't sure whether I would receive this compound in time, I decided last weekend to put some clear over the paint, to hide the swirlmarks and give the paint a tough protecting layer.
While I had used Tamiya's X22 Clear for the Jaguar of Inspector Morse, I didn't want to use this clear on this car because of the problems I'd had with achieving a smooth layer.
I decided to use Revell's Aqua Colour clear for this project, because I've had only positive results with Revell's series of paint.
Until last weekend that is. Because, although the paint layed down perfectly and smooth on the car, it dried rough and almost flat with no shine at all.
I can say that I wasn't really thrilled with this result. Sunday evening I tried for almost an hour to see whether is was possible to salvage the paint job, but alas. No go for the ESM and go for the brake fluid.
The worst part however, is that I really can't pin down what went wrong here. It could be that I thinned the clear too much, but I really don't think so.
But in the future I won't be using this clear on my cars anymore, unless I find out what went wrong.
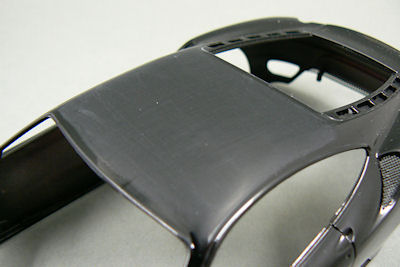
Below are a few pictures of the car body, before it went into the brake fluid. The second picture is from the roof, after I tried to save what could be saved...
Sadly I forgot to take any pictures before I applied the clear, so there's no proof that the car looked better before...

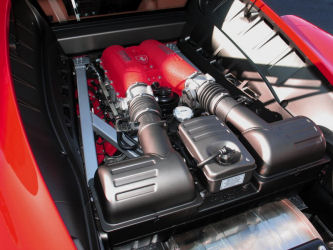
Not all was bad
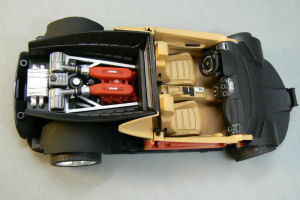
Not taking into account the disaster I had with the clear coat, this build was actually coming along quite well.The engine room has received a few extra details and has been finished.
I used several photo's (of which one is shown below as a comparance) as reference to add the cables and hoses that are in the engine room. Not 100% accurate (which is impossible anyway, because Fujimi has simplified the engine compartment in this kit a lot), but it looks quite nice anyway (at least in my opinion).
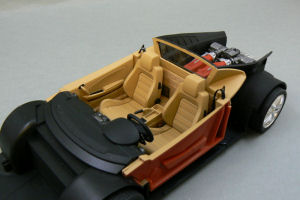
The interior has also been finished in the meantime.
And here I also added several extra's to spice things up a bit.
As the interior is quite bright I felt the need to add those extra's because the interior will be quite visible when the car is complete.
So I made a few extra bits with some styrene materials and I also added seatbelts using PE parts from the Crazy Modeler detail set and black silk ribbon (2 mm wide).
And after the interior and engine room had been finished I mounted them onto the chassis:
The final thing I've been working on are the windows.
I had already painted the black areas of the windows. But as the build progressed I felt that I also had to paint the interior of the clear part that's been used for the windows.
It probably won't be visible to the casual observer, but I felt it was something that needed to be done here, as the interior will be very visible.
End of this update.
I hope I'll be able to show the finished car in the next update.
2008, January 13 - Starting all over again
After a nice dip into the brake fluid, all evidence of a crappy paintjob has been removed.And now I can start all over again.
After the body came out of the brake fluid, I scrubbed it down with an old toothbrush and some lukewarm soapy water, to remove all the residue of the brake fluid.
Then I noticed something that I haven't seen before. It seems that the brake fluid softened the plastic of the body a bit. Because while scrubbing the body I noticed that the roof seemed to "move" when I scrubbed it.
And indeed, a nice crack has appeared on the roof. After drying the body, I put some styrene glue into the crack from the underside. I used the ultra thin cement from Tamiya which did the job perfectly.
What I also noticed was that the Tamiya putty I have used on this kit does not like brake fluid. So I also have to redo the putty work on the body.
Nothing major, but it definately needs to be done.
During my visit to Euro Scale Modeling last year I had the chance to speak to some fellow modelers. Especially one person from the Belgian "De Paddock" community was very helpful in giving advice concerning painting of car bodies.
So when I got home, I immediately paid a visit to Steve Hemming's on-line store (Hiroboy) and ordered some automotive paint and 2K urethane clear.
As I've read that this 2K clear is quite nasty stuff, I also bought myself a respirator with appropriate filters.
But before I can use the paint, the clear and the respirator I had to redo some parts with putty and repair the roof further.
With this work now nearly finished, the end of this build is, once again, drawing near. And although I stated at the end of the previous page, evidently in an optimistic mood, to show the finished model in this update, by now I can tell you that it won't happen yet. And I'm not going to predict that it will be ready in time for the next update.
But hey, sometimes miracles do happen...
End of this update.
2008, February 18 - Almost reached the end
In the previous update you could see that I had repaired all the bad spots I had discovered in the bodyshell of the Ferrari.After that I washed the model in lukewarm soapy water with an old toothbrush to remove all the sanding residue and my fingerprints (hah, eat that CSI).
After I had let the model dry in the air I sprayed the first coat of primer. This was necessary as a precaution, to prevent the Zero Paints paint I bought from "attacking" the plastic of the body.
After the first coat of primer I noticed several small spots which still needed to be repaired. An example can be seen in the pictures above.
So out came the putty again, to repair those final spots.
After that had been done, I sprayed a few more coats of primer to get good coverage.
After the final coat of primer I carefully restored and deepened several panellines of the car and after that was done I did wash the body again and it now was ready to receive the colour coat.
After the body had dried, I applied 4 coats of Nero and let the paint thoroughly dry.
As this paint dries semi-gloss it was necessary to cover the body with clearcoat. To that end I had purchased 2 component clear coat from Zero Paints.
And after applying two layers of clear the car looks like this:
As can be seen on the right picture above, several spots remain in the clear. This was mostly due to the fact that the fans used in the spray-booth setup aren't powerfull enough and the fact that it might have been better to cover the model with a box, to prevent dust from settling on the model.
The spots will be sanded flat and after that I will use compound to smooth the layer of clear further as a very slight hint of orange peel is also visible on some parts of the body.
After the body has been smoothed out, I will paint the windowrubbers and air-vents of the engine room and than I will wax the model.
And hopefully for next update I will have finished this car and be able to show you how it finally turned out.
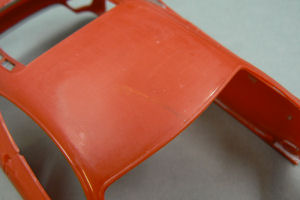
2010, December 5 - Out with the old, in with the new...
The final sentence of the previous update couldn't be further from the truth.Finished it is definately not. Well, yes and no actually. The car is not finished, but the body is. And had already been sent on a one-way trip to garbage-ness...
When trying to sand smooth the various spots left in the layer of clear and smooth out the clear in general a problem occured. Something which I haven't encountered with the Peugeot 307 of Gigi Galli.
For some reason I wasn't able to smooth out the layer enough and worst of all, I seemed to have damaged the clearcoat. I've sanded and compounded my hands sore, but for some reason I couldn't get the shine back into the clear. Very strange.
On top of it all the roof finally cracked for good after the plastic had already been weakened when stripping a previous paintjob.
The sad result can be seen in the picture below left.
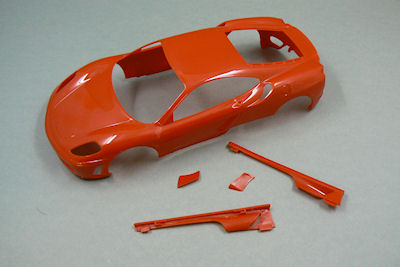
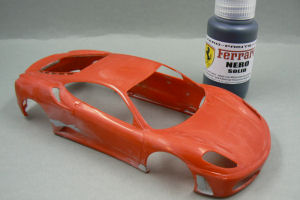
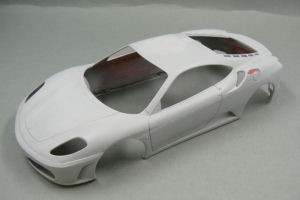
I placed a message in the classifieds section of Automotive Forums and to my luck and joy I got a very quick and positive response. User "exit13" (Jon Winter, a regular contributor to Tamiya Model Magazine) had an almost complete kit lying around which he wasn't going to use anymore.
I could buy the kit from him for a very reasonable price and I could start working again.
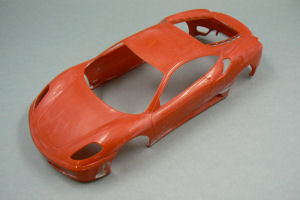
The new body (and parts) can be seen in de picture above right.
Second time will be easier
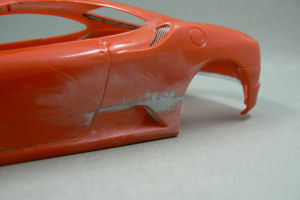
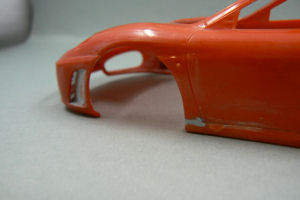
Someone once told me that when you do something for the second time, you won't be making the mistakes you made the first time.Well. Let's just wait and see.
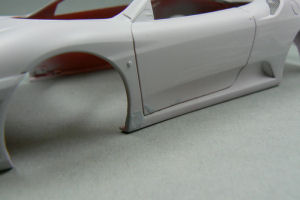
Preparation of the new body is going well. The inserts in front of the front wheels have been blended in with the rest of the body.
Some minor scratches I happened to make while deepening the panel lines of the model have been repaired.
Another addition I made was drilling some holes in the mirror supports and the body. I glued some small pieces of wire into the mirror supports to create a better joint when mounting the mirrors.
Last picture is from (part of) the body after priming. As can be seen, a few spots had to be taken care of.
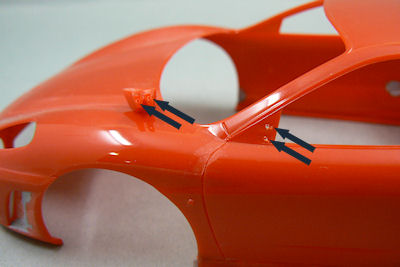
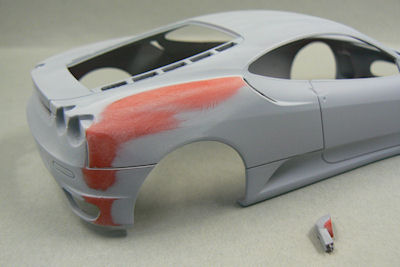
A final coat of primer is all it needs now, and than I can commence with the real painting.
But that will be for the next update.