


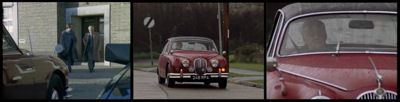
Jaguar Mk. II Saloon
Jaguar Mk. II Saloon "Inspector Morse"
2007, April 1
This will be my build report for the Jaguar Mk. II Saloon that was driven by chief inspector Morse in the TV-series of the same name.
My intention was to build this car for my fathers 50th birthday, as he is a great fan of the TV series.
Knowing that my father was born in 1948, I think it is safe to say that I am a bit late with this build. But that doesn't prevent me from starting it (finally).
This will be my first build after my period of absence from the hobby. And that's why my first intention was to build this car out of the box. I figured that it would be a challenge enough just OOB, without adding extra details and so on.
But extra details would make the car look much nicer. Just look at all those great examples on the forums.
And thus I decided to add some extra detail, to spice things up a bit.
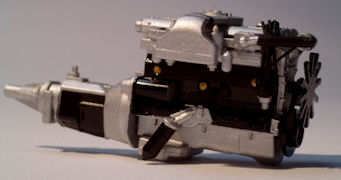
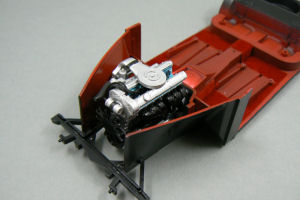
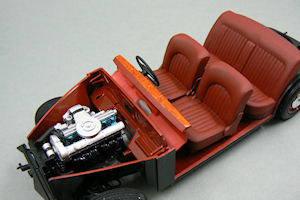
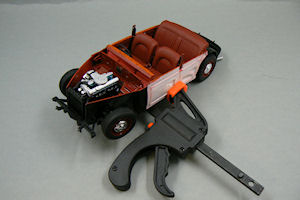
The engine
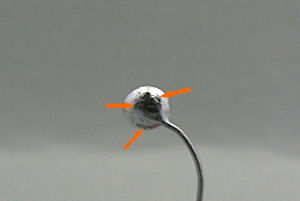
I started this build with the engine. The detail on the engine in this kit is quite good. But I figured that some additional plugwires would look good.To that end I drilled some holes in the engine, the ignition coil and the (funnily shaped) distributor.
The holes in the engine and ignition coil where no problem. But drilling the 7 required holes into the tiny distributor was a different story. I did manage to get the holes in, but there was not much left of the distributor.
But the distributor won't be very visible (same as on the picture below, because that strange blob on the foreground is the distributor...), once the car is completed, so that won't be much of a problem.
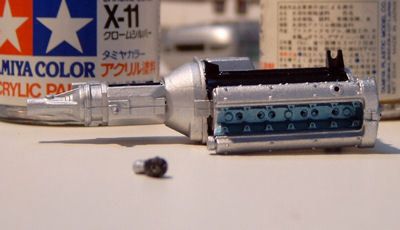
I noticed that Tamiya had made a few mistakes with the paint-instructions for the engine, which I rectified in my build.
Nothing dramatic really, because in all the pictures of old and restored Jaguar Mk.II Saloons I have found, I think none of the engines where exactly the same regarding the colours. And as I don't have a picture of the engine from the car in the TV series, there's no guarantee that I got it right.
What I also did was strip the cam-covers of their chrome plating (by putting them in toilet-cleaner with chloride). I found the plated parts too shiny. After stripping them they were painted with X11 Silver from Tamiya.
What I do know however, is that the engine in Inspector Morse's car is a 2.4 litre engine, while the engine in this kit is a 3.8 litre engine. So there are bound to be some differences (probably concerning the carburettor-system, I'm not sure), so this kit will never be an exact 1-on-1 copy of the real car. But as long as the hood is kept closed, nobody will see in the end (I hope).
Building and wiring the engine was pretty straightforward really. If I had to do it again, I'd probably use thinner wires for the sparkplugs, but for a first time I was quite pleased with the result.
Even though not all wires will be connected to the distributor... But as I've mentioned before, this will be barely visible, once the car is completed, so that's no big deal.
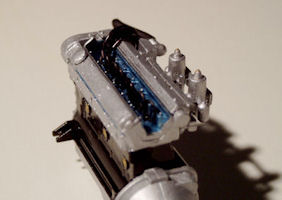
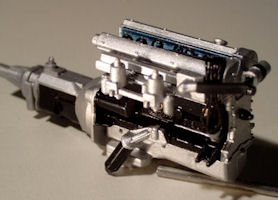
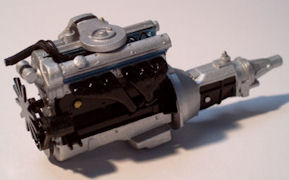
A few pictures of the completed engine:
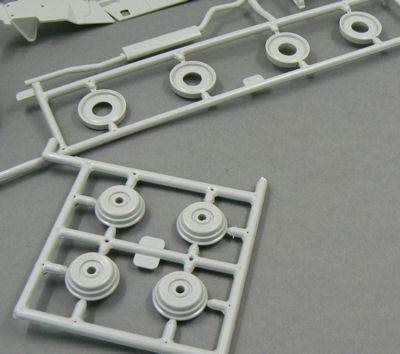
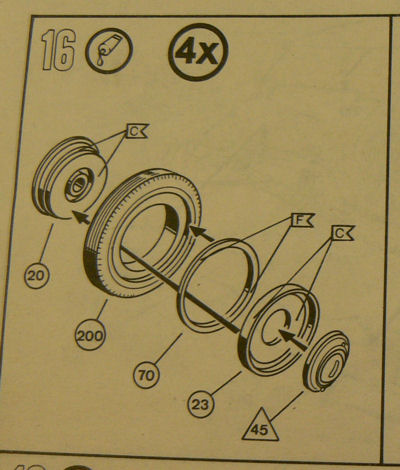
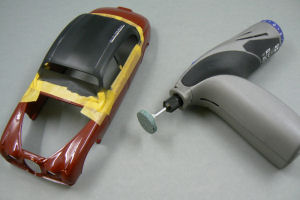
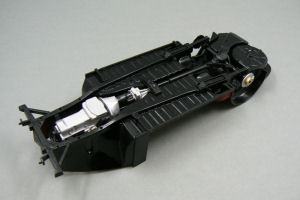
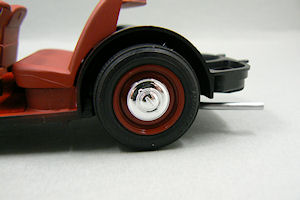
The Wheels
After the engine was completed I took to the wheels.The original wheels that were provided in the kit were open spoked wheels. And they looked really good. But I couldn't use them, because Inspector Morse's car has closed wheels with a chrome hubcap.
At first I tried to find replacement wheels. I thought that the wheels of a Lotus 7 might fit. But sadly, they don't.
As I couldn't find a replacement, I had no choice but to adapt the wheels from the kit.
I started by grinding as much as possible of the spokes from the wheels. After that I used putty (the "regular" one from Tamiya) to create an even finish after the grinding.
I again used a grinding tool in my Dremel to smoothen things further out.
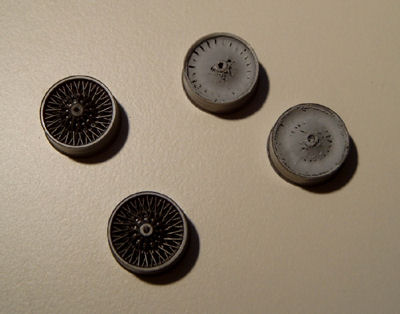
After several new layers of puttying and grinding the wheels, I came to a reasonable result, considering the fact that I don't have a lathe or something similar at my disposal.
The picture is a bit fuzzy, but I think that the general idea is clear.
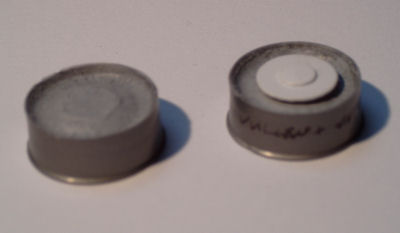
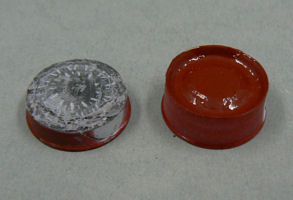
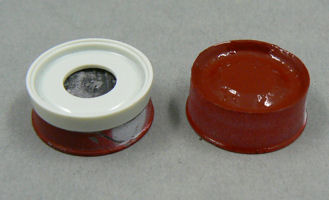
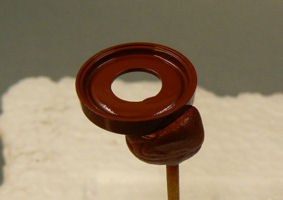
As can be seen in the picture above, I tried to make the hubcaps myself. I used styrene sheetmaterial for this.
With the aid of a drawing tool, I drew the circles onto the sheet and cut them roughly out of the sheet. After that I used files and sandpaper to make the parts circular.
And I must say I was pretty pleased with the result, but it still looked like two pieces of sheet glued together.
The company I worked for at that time makes use of contractors to produce their machine(d) parts and I approached one of the contractors for these hubcaps. And to my delight they made them for me for free. Very nice.
And after I painted them with Alclad Chrome, I was very happy with the result.

Even though I'm satisfied with these hubcaps I think I'll sand them down again to smoothen out the surface, because with this Alclad Chrome paint you can see even the smallest spot or scratch. But all in all I'm very pleased with how the hubcaps look. Especially on the painted wheels.
The Exhaust
To become one with the subject (...) I decided to watch a few episodes of Inspector Morse myself. Why I never watched this series I don't know (probably because the episodes have a duration of 1 and a half hour), but they were actually good.The episodes I watched were from the final season. So if anyone is into murder mysteries, you can't go wrong with Inspector Morse, imho.
But watching the episodes I noticed a few things about the car of the Inspector.
For one, there was only a single exhaust-pipe. Hmmm, and the kit car has a double exhaust. So, I had to make some modifications.
Sadly I had already assembled and painted the kit-provided exhaust. Even drilled out the end of the exhaust-pipes for a more realistic look. Let's just say that it was a good practice case.
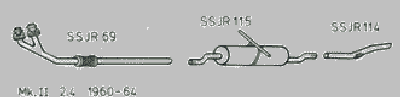
After some searching on internet I found a site where you could buy spare parts for vintage cars, like the Jaguar Mk.II Saloon. And I was glad, because up till now I hadn't been able to find a picture of the exhaust for a 2.4 litre engine.
But here it is, this is what the exhaust for this build should look like (sort of):
Let the modifications commence.
First part I tackled was the muffler. I had to change the double one from the kit to a single one. I considered modifying the existing one, hoping to keep the amount of effort needed to a minimum.
But I soon realised that modifying the kit part was not an option.
As I was planning on using the existing exhaust pipes for my modifications I cut them from the muffler and subsequently separated the two exhaust-pipes from eachother.
Only thing to do now would be making a new muffler. But that was easier said than done. It took me several tries to come up with an acceptable solution.
At first I was planning on using a wooden piece as a core, and build up the diameter of the muffler by layering longitudinally cut pieces of drinking straws over the core. But in the end I ended up with an oval kind of muffler with no easy way of making something round of it.
Next attempt was some styrene tube of which I filled the ends with Tamiya putty. But the solvents in the putty melted the styrene tube (partially), so the end pieces looked kind of funny. This was also no option.
Third and last attempt was again with styrene tube. But now I glued some styrene sheet to the ends of the tube. After the glue had dried I trimmed the glued on sheets and with sandpaper and files I modified them further, so they would blend in with the tube. A nice and satisfying solution.
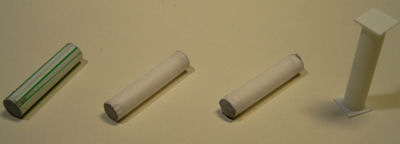
After I had finished the muffler I added a tiny wire to the ends, to simulate the folded ends.
I haven't finished the complete exhaust yet, as I want to finish the bottom-plate of the car including the engine first so I can testfit the part, before I make permanent modifications.
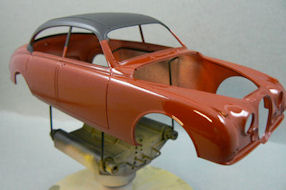
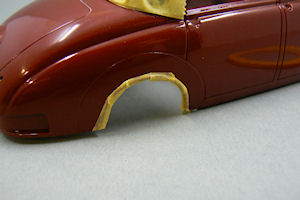
The Body
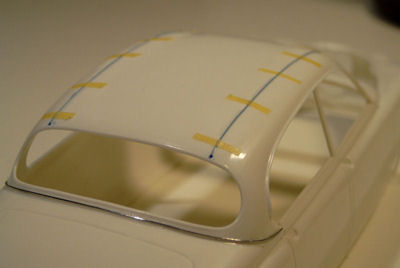
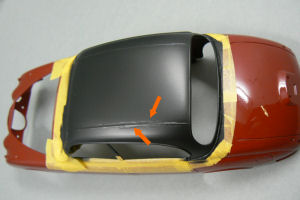
As can be seen in the first picture on page 1, the car of Inspector Morse has a black vinyl roof.I've been wondering a lot about how I was going to let this show on this car. Apart from the very subtle texture the vinyl roof has also several (small) seams running over the roof. And I wanted this texture and seams to show on this car.
First I would busy myself with the seams. Paying close attention to the reference pictures I gathered I marked the spots were the seams would come. And to replicate the seams I used very thin wire, which I glued to the roof with CA glue.
To prevent the wires from moving and to keep them in place during curing of the glue, I used Tamiya masking tape to tape them to the roof. Next I applied CA glue to the joint between the wires and the roof to glue it together.
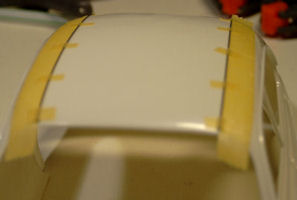

But I wasn't happy with my first attempt. The wire I had used was still too thick. So I removed the wires and used other, thinner, wire in my second attempt.
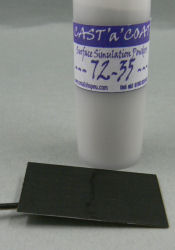
I had thought of several ways to replicate the texture. First option was Cast-a-Coat. This material is often used in military modeling to give surfaces a casted-like appearance or to make anti-slip coating on modern tanks and vehicles.
I thought this might also be used here to recreate the very fine texture on the roof of this car.
But after my first, failed, attempt were I tried to create a casting texture on the intake plenum of the Ferrari F430, I was a bit wary of using this stuff on the roof of this car.
In the meantime I had also read positive things on Faux Fabric from Scale Motorsports, a spray-can with some kind of special paint with which it was possible to create a textured surface.
I ordered a can and test-sprayed it on a scrapped model. But it was a bit of a disaster. I followed the exact directions on the label of the can, but something went wrong, because the result of this test looked completely sh*t. Probably should have shaken the can longer, although I did it exactly as said in the instructions.
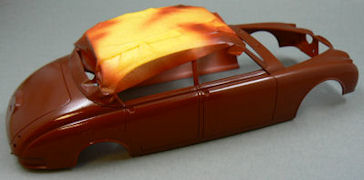
And by the time I was ready to paint the roof, the rest of the car was already painted. So it had to go right the first time, because I was very satisfied with the rest of the paintwork and definately wouldn't want to risk having to strip it.
So, Faux Fabric was also put aside.
After my succesfull attempt to recreate a casting texture on the intake plenum of the Ferrari (by using very low pressure and little flow with the airbrush) I decided that I would use this technique also on the roof of this car.
But first I painted the rest of the body. I used Tamiya masking tape to mask the roof.
I was going to paint the car Opaque Maroon. But after mixing the color I found out that the colour was way too bright, compared to the reference pictures I have.
So I decided to make a custom mix, consisting of Tamiya colours X7 Red and XF57 Hull Red.
The original mix, as described in the building instructions added also X11 Silver into the mix. But on all the pictures I gathered of Inspector Morse's car I never found any evidence of metallic paint. That's why I only used X7 and XF57 to recreate the colour of the real car.
After several attempts I found a good mixture and started painting the car. First I did 3 light coats, and after that I added 2 heavy (wet) coats.
Between coats I sanded the body lightly to remove trapped dust and uneven patches.
And I must admit that I was very satisfied with how the colour and paintwork turned out. This was the first time since years that I painted a car body with the airbrush and I was delighted with this result.
I decided to use clear on the car to give it an extra shine. And that's were things went downhill (a bit).
I found it very difficult spraying X22 Clear from Tamiya. The clear didn't flow as nice and predictably as the paint I used before. Even after 1:1 thinning, the clear wouldn't flow right.
I tried several things; more pressure, less pressure, more flow, less flow, shorter distance, greater distance it wouldn't help.
And in the end I ended up with a severe case of orange peel.
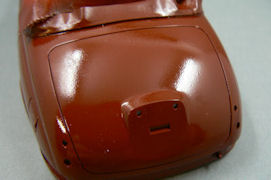
So, out came the MicroMesh polishing cloths and I started to sand out the orange peel.
Sadly I had to repaint several small spots, because, although I had been very careful, I sanded through the paint layer on several places. Nothing dramatic luckily and it was easily fixed.
After that I again clearcoated the body. This time I thinned the clear even more. It made it flow a little bit better, bit it still wasn't to my satisfaction. Next time I'll try another brand of clearcoat. Strange is that if I mix the clearcoat with Flat Base from Tamiya, the clear flows a lot better and predictable...
Anyway, I cleared the body again and after my initial fear that I had to sand again, the clear dried up reasonably smooth. I hope to get it better with some Polishing Compound. But before I tackle that task, the roof will be painted.
Before I could paint the roof I had to mask off the body of the car. I used Tamiya masking tape for the important bits and used a piece of paper with a cut-out for the roofsection to mask off the rest.
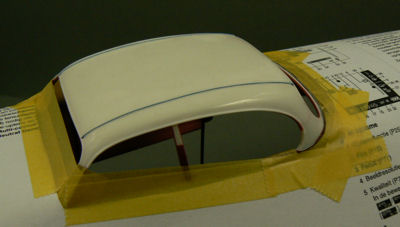
After masking I proceeded with painting the roof. For the color of the roof I used Revell Aquacolor semigloss black. The Aquacolor range of Revell is a range of odourless acrylic paints which are very easy to work with and can be thinned with regular tap water.
I've used several of these colours with brush and airbrush and they're really great to work with. I just hope that Revell will extend their current limited range of colours soon.
I thinned the colour with water in a ratio of 2:1 (colour:water) and sprayed several layers onto the roof.
At first I tried to recreate the structure of the roofmaterial as I had done with the intake plenum of the Ferrari F430. The attempt failed (probably because I had thinned the paint a bit too much). But afterwards I'm glad it failed, because on second thought I don't think it would have looked right.
Looking at the roof of Inspector Morse's car, you can see that the structure of the roof is very fine (if you can see it at all, because the picture below isn't that great). In my opinion too fine to recreate realistically in scale. So I will leave the roof as it is now, which I'm quite happy with.

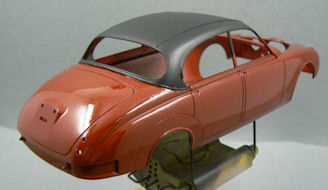
The masking tape has left some residue behind on the car, as you can see in the picture above, but the residue will come off when I polish the car with polishing compound and wax (at least, that's what I hope).
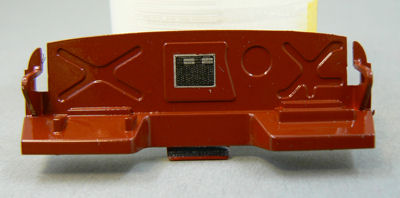
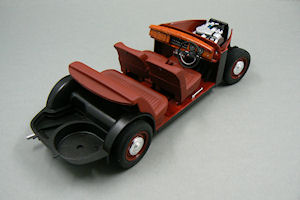
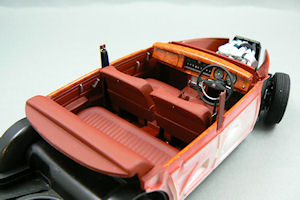
The Interior
In the meantime I had also started work on the interior of the car.The interior is very nicely recreated, with lots of detail. And in the kit is also a sheet of felt-like material included. To make the carpets on the floor of the car from. A nice touch.
I decided to build the interior almost completely OOB. I would love to add the details that Ramon Garcia added in his build on Automotive Forums. But, for now, I lack the patience and the skill to take on such a task.
Besides, once the car is complete, you won't see that much of the interior anymore, so OOB it will be.
There wasn't much to build, so I could start painting right away.
But after I painted the interior in the colours that Tamiya advised, I came to the conclusion that they didn't look right, compared to the pictures of Inspector Morse's car. They were too bright.
So off went the parts into some brake fluid, to strip the paint from the parts.
After all the paint had come off, I cleaned the parts again with lukewarm water and dishwashing soap. After the parts had dried, I mixed several shades of red, corresponding with the colour of the car and airbrushed the interior with them.
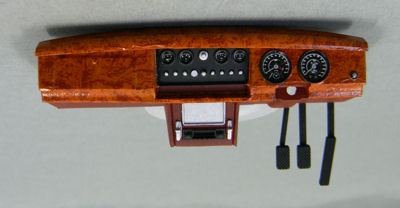
Below is a picture of the dashboard (which still needs some correcting here and there).
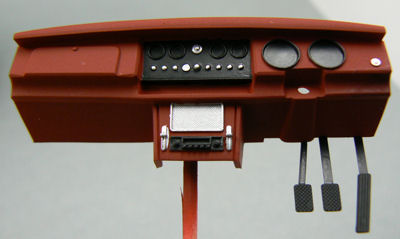
The main colours (red in 2 shades) have been mixed from Tamiya acrylic paints (XF-7 and XF-57 to be precise). The black and silver details have been brush-painted with Aquacolor colours from Revell.
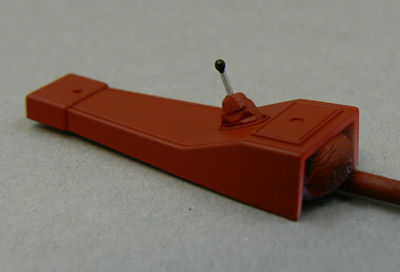
While painting the interior parts, I noticed that the gear-shift lever was missing. That's one of the dangers of spending almost 2 years building a kit. Oh, and being a bit sloppy in storing the parts doesn't help either.
I turned my hobby-room upside down, but couldn't find the gearshift lever anywhere. So I had to scratchbuild it.
I took a piece of plastic I cut from a parts tree, filed it roughly into shape and made a few cuts here and there, to simulate the wrinkles in the leather of the gearshift lever.
In the end I'm satisfied with the result, although it's still a shame that I lost the original part. I'll probably find it once the car is finished...
Up close, the part looks quite "lumpy". But I'm convinced that it will look good enough, once everything has been put together.

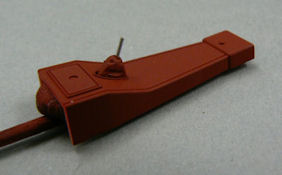
Only thing left to do on the gearshift lever is to make on knob on top of it. And I'm planning to do that by building up layers of paint-droplets.
The interior is finished so far. Next thing will be to add the carpeting to the floor of the car and to put the required decals (dials and woodfinish) onto the interior parts.
But before I start with that, I'll clearcoat the parts with some satin clear, to give the leather of the chairs that "leathery" shine and to provide a smooth surface for the decals.
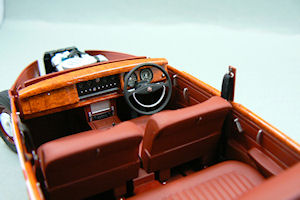
2007, April 24 - The Interior, continued
Work has been going on with the interior of this car. And I must say that I am quite happy with the results so far.After I had painted (most of) the interior in the previous update, it was time to start with the decalling.
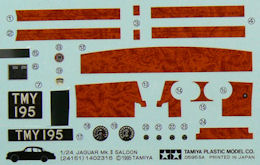
As I have shown in the last photo of the previous update, there are a lot of decals that have to be applied onto the interior to simulate the wood that's been used in the real car.
I started with the sidepanels (or doors actually). After I had painted the levers for the doors and the windows I started with the decals.
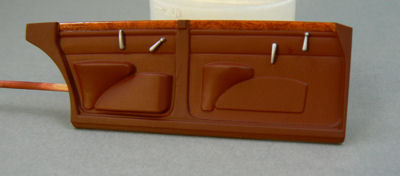
I really wonder how I could have managed that without Micro Sol and Set, to get the decals to conform to the shape of the door.
After applying Micro Sol I thought that nothing happened. Than the decals got all wrinkled. But after some time they smoothed out nicely, as can be seen from the picture above.
Strengthened by the results from the doors, I started on the dashboard. A bit more work, as the dashboard is quite complex in shape and the number of decals I had to apply (apart from the woodwork also the dials) was also a bit higher.
I spread this job over several days, to give the decals some time to settle and let the Micro Sol do it's job.
In the end, I can say that it was quite easy to apply the decals. But next time I'll have to pay a bit more attention to the positioning and smoothing of the decals as there are quite a few wrinkles visible in the dashboard decals. Even after several applications of Micro Sol the wrinkles are still there.
Not disturbing enough for me, but it's definately an area where I could and should improve.
After all the decals had set, I sprayed another layer of semigloss clear over the parts to seal in the decals. After that I brushpainted some gloss clear over the decals only to give the woodwork a bit of shine.
And after that had been done, I gave the dials some lenses by filling the dial areas with Micro Kristal Klear. Which gives a nice effect.
I'll post a picture of this in another update.
While I busied myself with the decals, inbetween applying and drying I also started on the floor of the car.
As I've shown in the previous update, I had already cut the floormats to size, and now it was time to glue them to the floor. Thanks to the adhesive backing that was a piece of cake.
After I had applied the floormats, I wanted to "finish" the floorplate of the car.
So I glued the rear suspension to the floorplate. And after that glued the rear brake discs to the suspension. Pretty straightforward.
I was also planning to attach the front suspension to the car. But as I am planning to do a bit of detailing in the engine room, I thought it would be better to leave the engine out for now. And that means that I cannot fix the front suspension yet, because the engine has to be mounted from the underside.
As I was applying decals all over the place, I also applied the decal (or actually car specs plate) to the engine room wall.
Finally for this update I want to show you what the gear-shift lever looks like after the little bit of scratch-building I had to do.
Up close it isn't totally convincing, but I'm sure nobody will notice that the original is missing once it is mounted onto the floorplate and surrounded by the other parts that make up the interior.
After I painted the leather-like part in the interior colour, I painted the lever silver (Revell Aqua Color) and after that I dipped the top of the lever in unthinned (ie. quite thick) Revell Aqua Color Semigloss black. I repeated this last action several times to build up a nice layer of paint to simulate the knob on the end of the gear-shift lever.
And that's it for this time.
Stay tuned for the next update !
2007, May 16 - Mirror mirror on the car...
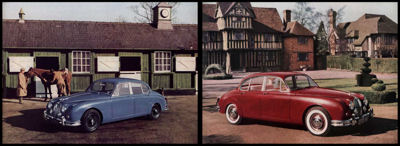
The mirrors that are provided in this kit don't really resemble the mirrors on the Inspector's car.Actually, I wonder how Tamiya decided which type of mirror to include in this kit. Because looking through the original car's brochure I can't help but notice the absence of any kind of mirror in all of the pictures and drawings. I find it hard to believe that the car would leave the factory without any rear-view mirrors. But apparently it did...
And when mirrors were finally mounted on the cars (by the owner or by Jaguar, I don't know), they were mounted all over the front of the car. Some were mounted close to the driver. Others were mounted almost at the front of the hood.
Pick one :
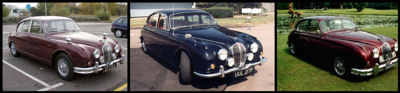
Luckily I had a few nice pictures (images from an episode) depicting the shape and position of the mirrors on Inspector Morse's car.
Sadly I thought I'd have to scratch-build the mirrors... Not my strongest point I'm afraid.
But luckily (again) I could use parts of the kit-provided mirrors. With a few minor modifications I managed to get them to look quite convincing.
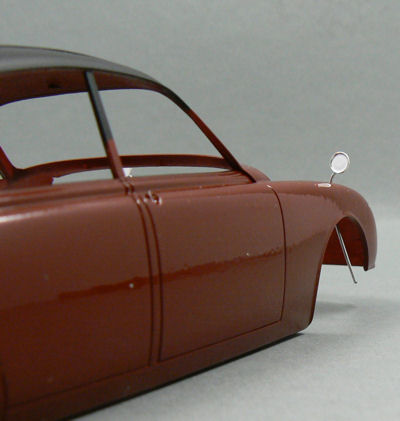
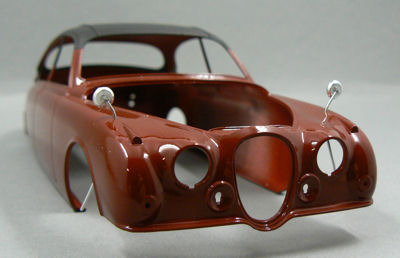
Only thing I'm contemplating is whether I should strip the chrome layer and putty the rear of the mirrors to give it a more finished look. I have some Alclad chrome, so stripping the chrome won't be a problem. I'll probably make the adjustments. But not until the next update !
2007, August 26 - Slow progress
As the title of this update reads, work has been a bit slow on this car.Most of my time has been devoted to the other 2 cars I am building.
As a matter of fact, I actually demodelled this car a bit, leaving me with more work to do, instead of less.
I've been not quite happy with the way tho roof looked. Especially the seams of the vinyl roof I had created with thin wire (0.25 mm).
Although the wire is very thin, I still found it out of scale, so I removed the "seams" from the roof, to replace them with thinner wire. And hoping that it will look more in scale.
Another valid reason for removing the wires was because I had been a bit sloppy with the glue. And because the layer of paint on the roof was very thin, the spilled glue stood out quite sharply.
So, after I had removed the wires, I sanded the roof smooth. Only thing to do now is glue some new, thinner (I have 0.15 lying around) wires to the roof, and repaint it.

Wheels keep on turning
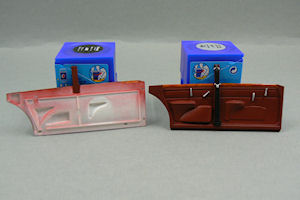
While scouring eBay for some kits I accidentaly stumbled upon the following kit:
The wheels of this car immediately caught my attention. They looked just like the wheels on the Inspectors car.
So I bought the kit. Only to find out that, although the wheels are indeed the ones I'm looking for, mounting them to the Inspectors car will be a whole different story.
Apart from the fact that I think it might be quite a challenge fitting Tamiya's soft vinyl tires around these rims.
Because, where Tamiya's wheels are made as one piece, the wheels from the Revell kit are made up of several parts (partly integrated with the tire). And that's not taking into account the different mounting principle.
First two pictures below are from Revell, the last one is from Tamiya.
In other words. I've got quite some work to do on this one.
End of this update.
2007, October 16 - Wheels of fortune
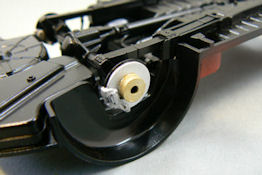
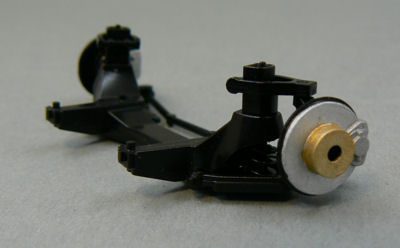
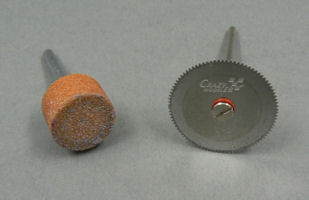
As it happens, the adapting of the wheels to mate the Revell and Tamiya parts turned out to be quite simple.To my surprise, the Tamiya wheels were quite thick. Thick enough to cut them in halve so that I can use the rear part of the Tamiya wheels (with the mounting pin) and the front part of the Revell wheels without too much problems.
I used a Crazy Modeler sawblade in my Dremel tool to cut up the Tamiya wheels. After I cut up the rims, I sanded them down a bit more with a grinding stone.

End of this update.
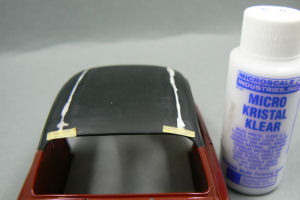
2008, January 13 - The roof is on fire...
Well, not really on fire. But at least some work has been done on it.Earlier in this build report I stated that I wasn't happy with the way the wires (simulating the seams of vinyl roof) looked. So I removed them. And in the meantime replaced them with very thin wires I used from a co-axial cable.
Instead of using superglue to glue the wires to the roof, I opted this time for Kristal Klear by Microscale Industries. Sounds impressive, but it's actually a kind of clear drying wood glue.
With the superglue I've had problems applying the glue even and sparingly. Although it didn't show before painting the roof, after painting the bits of glue that had seeped out from under the wire were very obvious. This was, together with the unrealistic size of the wires, another reason to try it again.
The Kristal Klear glue is water soluble and I used a wet Q-tip to remove the excess glue from the roof before the glue dried.
As I haven't painted the roof yet, I don't know how it will look in the end, but from what I can see now it looks very promising.
A small experiment
Also earlier in this report I said that I wouldn't apply a texture to the roof as the texture on the 1:1 roof is already very fine and I think it is not possible to downscale it realistically to this car.This doesn't deter me from a small experiment with some "Cast-a-coat" powder that I purchased some time ago.
I put some Krystal Klear on a piece of styrene and applied the powder according the instructions. I intentionally only covered half of the piece with Krystal Klear as I intended to do this job in 2 parts, to see whether the joint between the two halves would be visible.
After the powder had been applied, I sprayed some semigloss black over it. And this is how it looks:
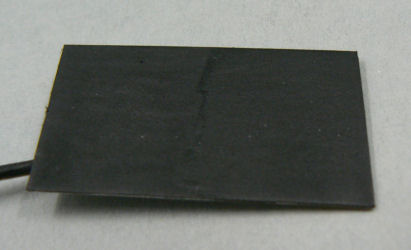
As can be seen from the pictures above, the seam can be seen. But with a bit of work, I think it can be nearly invisible.
But I still won't use this powder on the roof. I think that a semigloss finish will look convincing enough, and I'll be using this powder for other things...
End of this update.
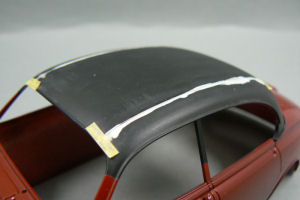
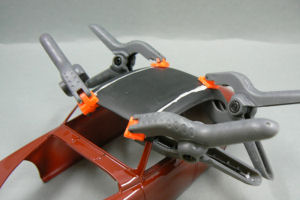
2008, February 18 - Through the roof (well, almost)
Work is finally continuing on this car. And work continues (once again) with the roof...In the previous update you could see that I glued new pieces of fine wire onto the roof. But at the ends of the wires you can also see that I held them in place with tape.
So there was no glue at the ends. And at first I had a bit of a hard time getting the ends glued to the roof, but with a little help of some friends, that problem was quickly resolved.
After everything was nicely glued to the roof, it was painting time. To that end I used once more semi gloss black from the Revell Aqua Color range. It dries almost instantly and gives a very smooth finish.
So smooth in fact, that I could very easily see were I had been a bit "trigger-happy" with the glue. Darn.
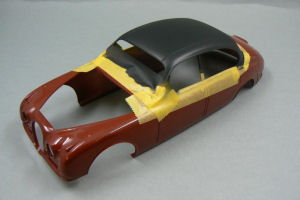

That needed to be fixed.
Luckily, it just had been my birthday. And since a few days I was the proud owner of a Dremel Stylus. Niiiiice.
So, I chucked in a grinding tool and ground away at the roof. And it looked absolutely fabulous. I took every care not to grind too deep and it looked perfect.
After grinding, I smoothed the roof once more with some sanding sticks and for the n-th time I airbrushed the roof.
My first reaction was : What the f... ?
So, were it at first appeared that everything was perfect, it was actually far from it.
In fact, it took me 2 more attempts to get the roof to look good again. There is one minor spot still left, but I won't be repairing that as it isn't very disturbing.
Of this current state I didn't take any pictures yet, so you'll see the finished roof in the next update.
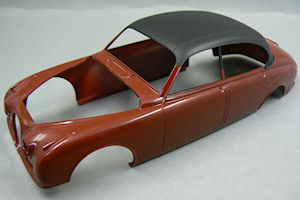
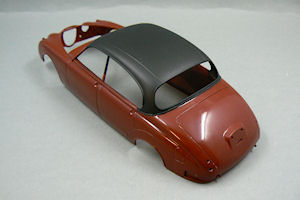
It is nice to see that more sections of this car are nearing completion. The end of this build is now really drawing near. Which isn't a bad thing, because I've been working on it for long enough.
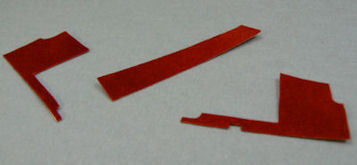
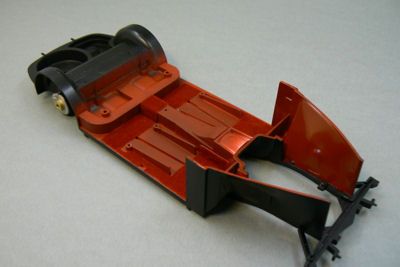
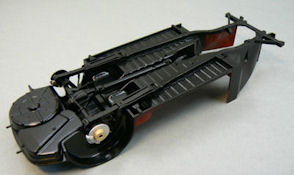
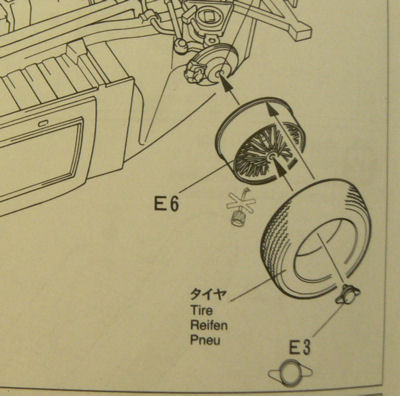
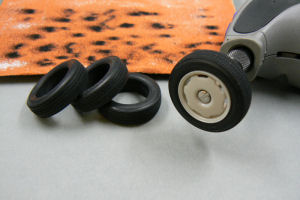
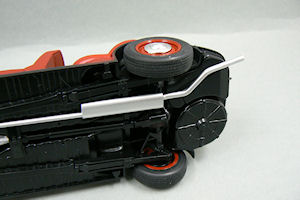
Below a few pictures of the tires (which have been sanded to remove the mold line) and the finished wheels.
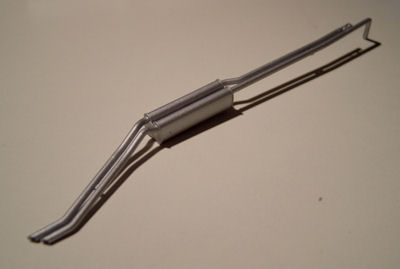
the exhaust
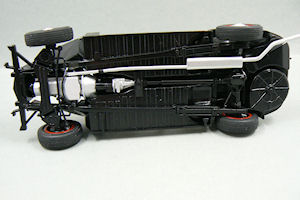
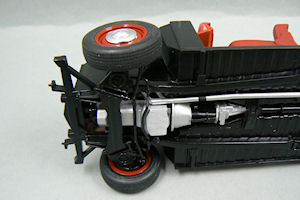
Next up was the exhaust. As I mentioned in a previous update, the exhaust system of this kit is for the 3.6 litre engine. Which in effect means that the car has a double exhaust pipe.The car which inspector Morse drove had a 2.4 litre engine and a single exhaust.
For this operation I cut up the exhaust of this kit and the exhaust of a Revell Jaguar XK120 kit (of which I have used the hubcaps, depicted on the previous page).
But before I could testfit the new exhaust I had to mount the engine to the floor.
My intention was to leave the engine out as long as possible so that I had the opportunity to put some extra detail into the engine compartment.
But as this build is going on and as I've received some excellent reference pictures of the newly restored original car there are reasons for me not to put a lot of detail and effort into the engine compartment.
First reason is that I think it is about time to finish the build, and adding extra detail will only cost more time.
But more importantly, the engine in the original car is quite different from the kit engine, and making an exact replica is above my abilities at the moment.
So that's why I decided to glue in the engine now so I was able to finish the underside of the car.
In the pictures below you can seen the new exhaust system.
First part of the exhaust is from the Tamiya kit. The silencer and last part of the exhaust are from the Revell kit.
I drilled small holes into the exhaust pipes and glued some wire into the parts to aid mounting of these parts to the silencer.
In the second picture you can see the complete exhaust. I fixed the parts with some tape and some other stuff, because this picture was taken while the glue was curing.
After the glue had cured I smoothed out several joints with some putty and the exhaust is now ready to be painted.
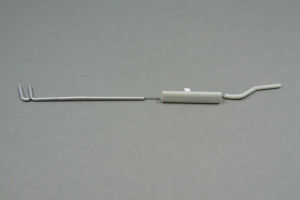
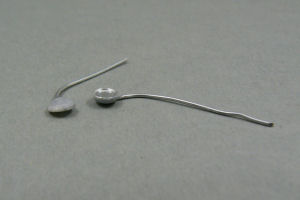
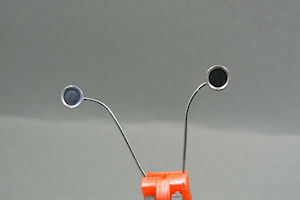
Final parts I've been working on are the rearview mirrors.
To get them to look like the real thing, I applied some putty to the back.
After the putty had dried I sanded the rear of the mirrors round. And I think it looks good.
After sanding I noticed that there were several air bubbles in the putty, so I tried to smoothen the surface with some diluted Krystal Klear.
The picture below was taken before I painted these parts. Currently they're painted black and I intend to spray them with Alclad Chrome.
But first I have to make sure that the back of the mirrors is as smooth as possible.
More on the build of this car in the next update !
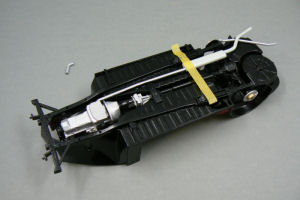
May 1, 2008 - Continuing work on the chassis
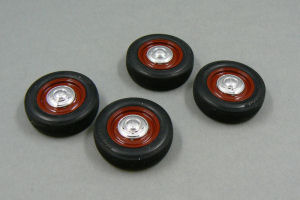
After the glue on the exhaust had dried, it was time to paint the part aluminium colour. I used the aluminium paint from the Revell Aqua Color range.After the paint had dried, I glued the exhaust to the car. I also put the wheels on the car, otherwise the exhaust might get scratched. And as I'm not intending on doing further work on the bottom of the car, it was as good a moment to put the car on it's own feet.
Only thing I still have to do concerning the wheels is touch up the hubcaps. Because part of the chrome layer has been removed where I had to cut the hubcaps from their sprue.
Now that the car has been put onto it's wheels, it was time to put together the interior of the car.
Next up were the side panels. But before I could glue them in place, I had to scratch build some seatbelts.
Although the original car had only 2-point seatbelts, the car Inspector Morse drove had in fact 3-point seatbelts. So I had to make them myself.
The build of this car is progressing nicely.
Next task will be the smoothing of the paint of the car, and than I can start polishing the body. After that, the window trim can be put in place. For that I will be using Bare Metal Foil for the first time.
I hope to be showing the results in the next update.
August 1, 2008 - Spick and span
When looking through the pictures of this project, I noticed that there had been no work done on this project since March. So it was about time to do something.As can been seen in the previous update, there seems not that much work left to finish this build.
But looks are deceiving. Because the layer of clear that has been put in this car has quite some orange peel to it, so I had to sand it all out. This process took me already a few hours, and I'm not finished yet.
As with the Peugeot 307 WRC, I used MicroMesh polishing clothes in the roughness 4000, 6000, 8000 and 12000 to sand out all the orange peel.
To protect the most delicate parts, where the expected layer of clear is thin, I masked them with masking tape before I started the sanding process.
But sadly, all these precautions couldn't prevent me from slightly damaging the paint layer. Because when I tried to clear the panel lines of the trunk from the sanding residue (with a wooden toothpick) I somehow managed to remove some tiny chips of paint.
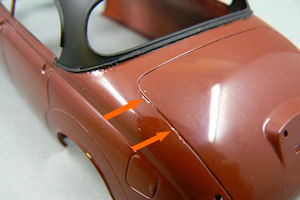
After completely sanding the car, the paint looks rather smooth.
All that is left to do now, is start polishing with the Tamiya polishing compound to hopefully get the same shine as I got on the Peugeot...
The hood of the car has already been polished and is looking very fine indeed. And I have good hope that the rest of the car will become just as shiny.
But that will be for the next update.
Apart from the sanding I've also been working on the mirrors.
Sadly they didn't turn out as well as I expected, so they need a little bit more work.
I had already painted the mirrors black before I could apply the Alclad II chrome finish. But after applying the chrome finish, several dents and tiny holes are still visible which need to be smoothed first.
More to follow in the next update.